Pull Requests
Last updated on 2024-12-19 | Edit this page
Overview
Questions
- What are pull requests for?
- How can I make a pull request?
Objectives
- Make a pull request and describe what they are useful for
Pull requests are a great way to collaborate with others using GitHub. Instead of making changes directly to a repository you can suggest changes to a repository using a pull request.
Pull requests are where your changes go through the vital steps of code and science review. Some of these code and science checks can be completely automated using pull requests (PRs). This helps speed up the review process and reduce the chance of human error when checking new code.
Creating a Pull Request
In the previous episodes we developed our changes on the
forecast branch. Let’s use a PR to merge these changes back
into the main branch.
Navigate to your weather GitHub repo. You should see a
notification appear with the text forecast had
recent pushes.

Click on the green Compare & pull request button.
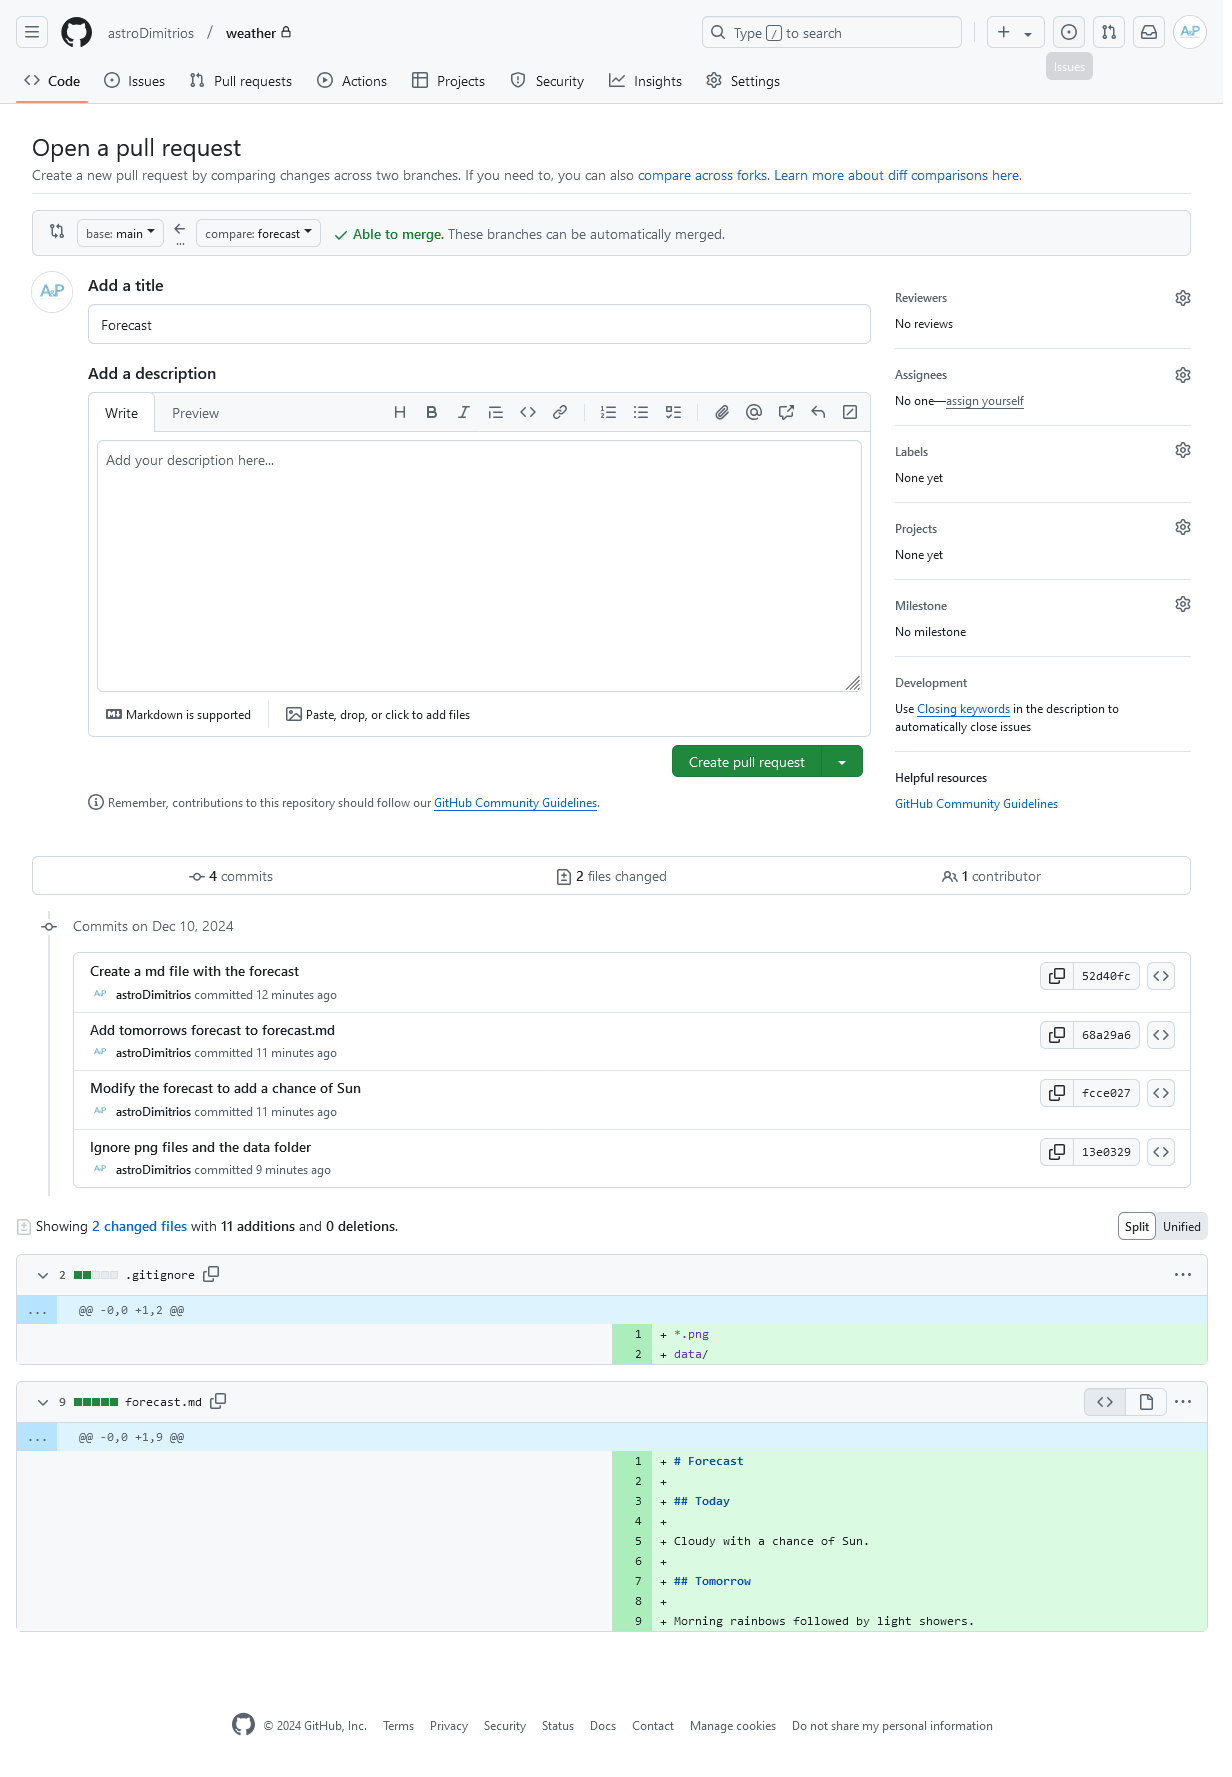
This page lets us create a new pull request from the
forecast branch. The title has been autofilled with the
message of the last commit. You can see all the commits on the branch at
the bottom of this page.
Make sure the title and description are clear. Then press the green Create pull request button.
Draft Pull Requests
If your changes are not ready for review yet you can mark the pull request as a draft:
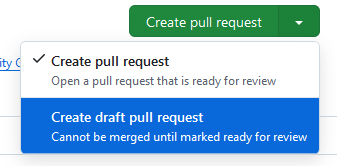
Draft pull requests can’t be merged and code reviewers aren’t automatically assigned.
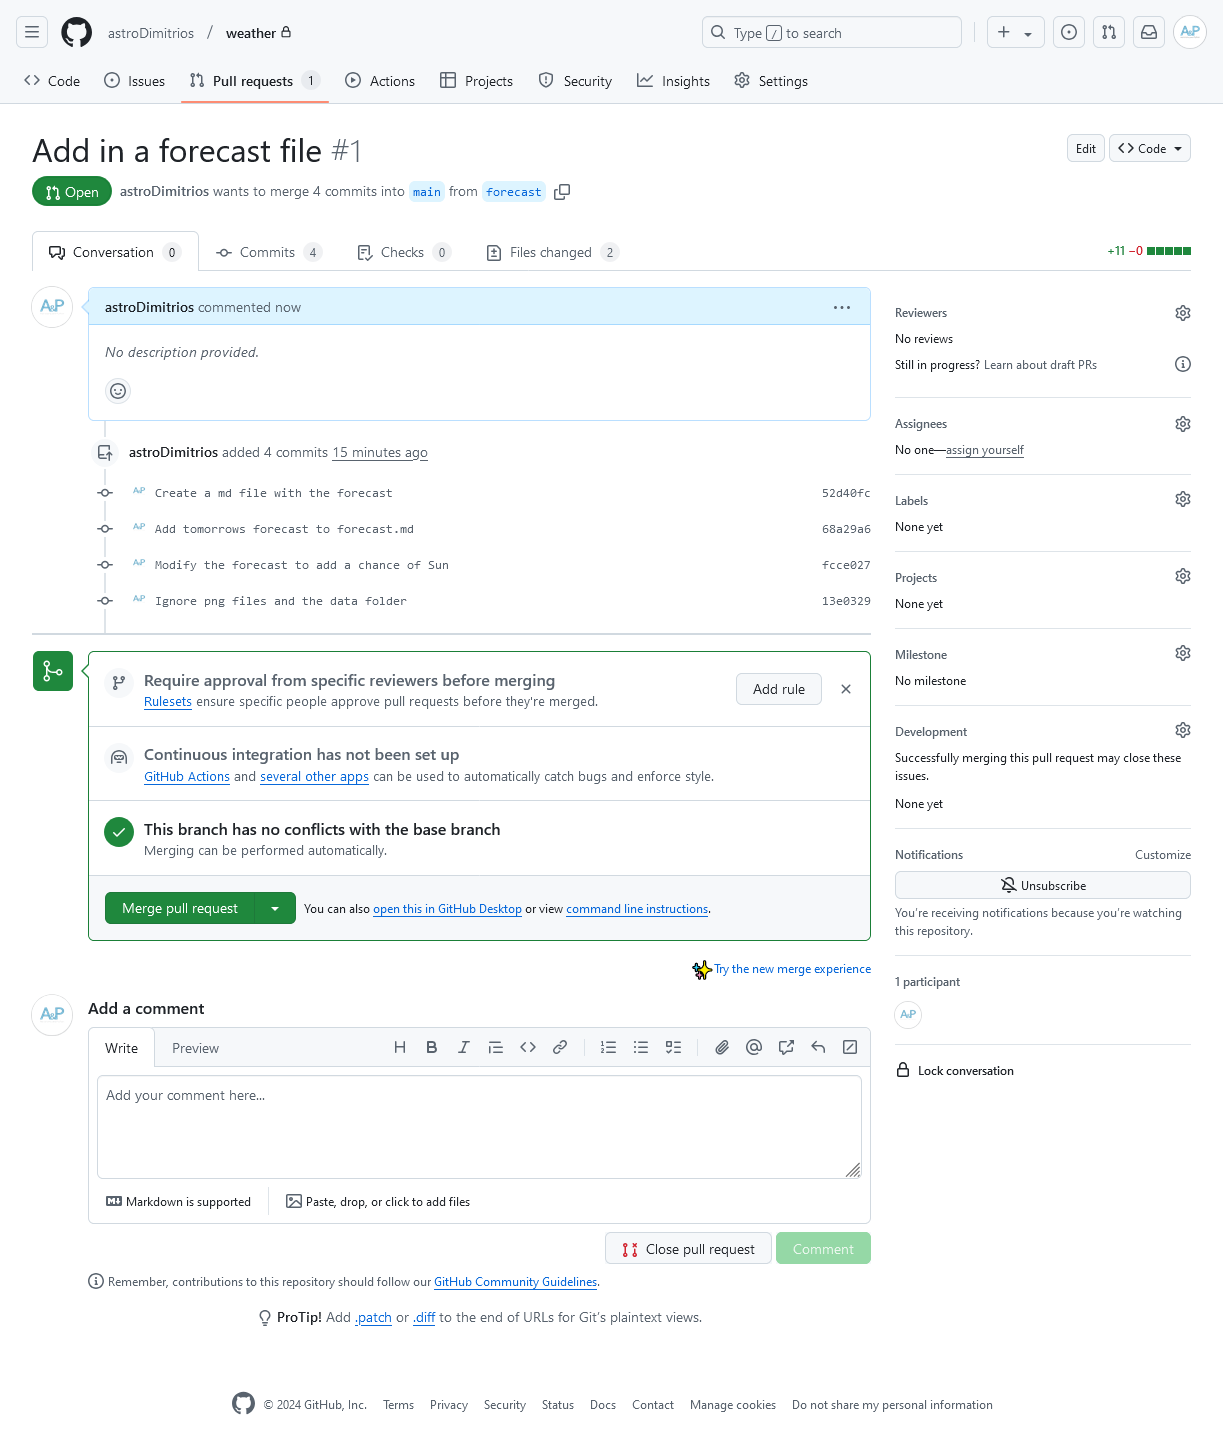
Notice we’ve now moved to the Pull Requests tab. This is PR #1 and underneath the title we see:
wants to merge 4 commits into
mainfromforecast
If you need to change the title or the branch you’re merging into, in
this case main, click on the edit button
to the far right of the title.
The PR has four tabs below the title section:
- Conversation is where code and science reviews occur
- Commits shows all the commits we want to merge
- Checks shows the output from any automated code and science checks
-
Files Changed shows a diff (difference) between the
branch with your changes,
forecast, and the target branch,main.
At this point you should use the diff in the Files changed tab to check your changes.
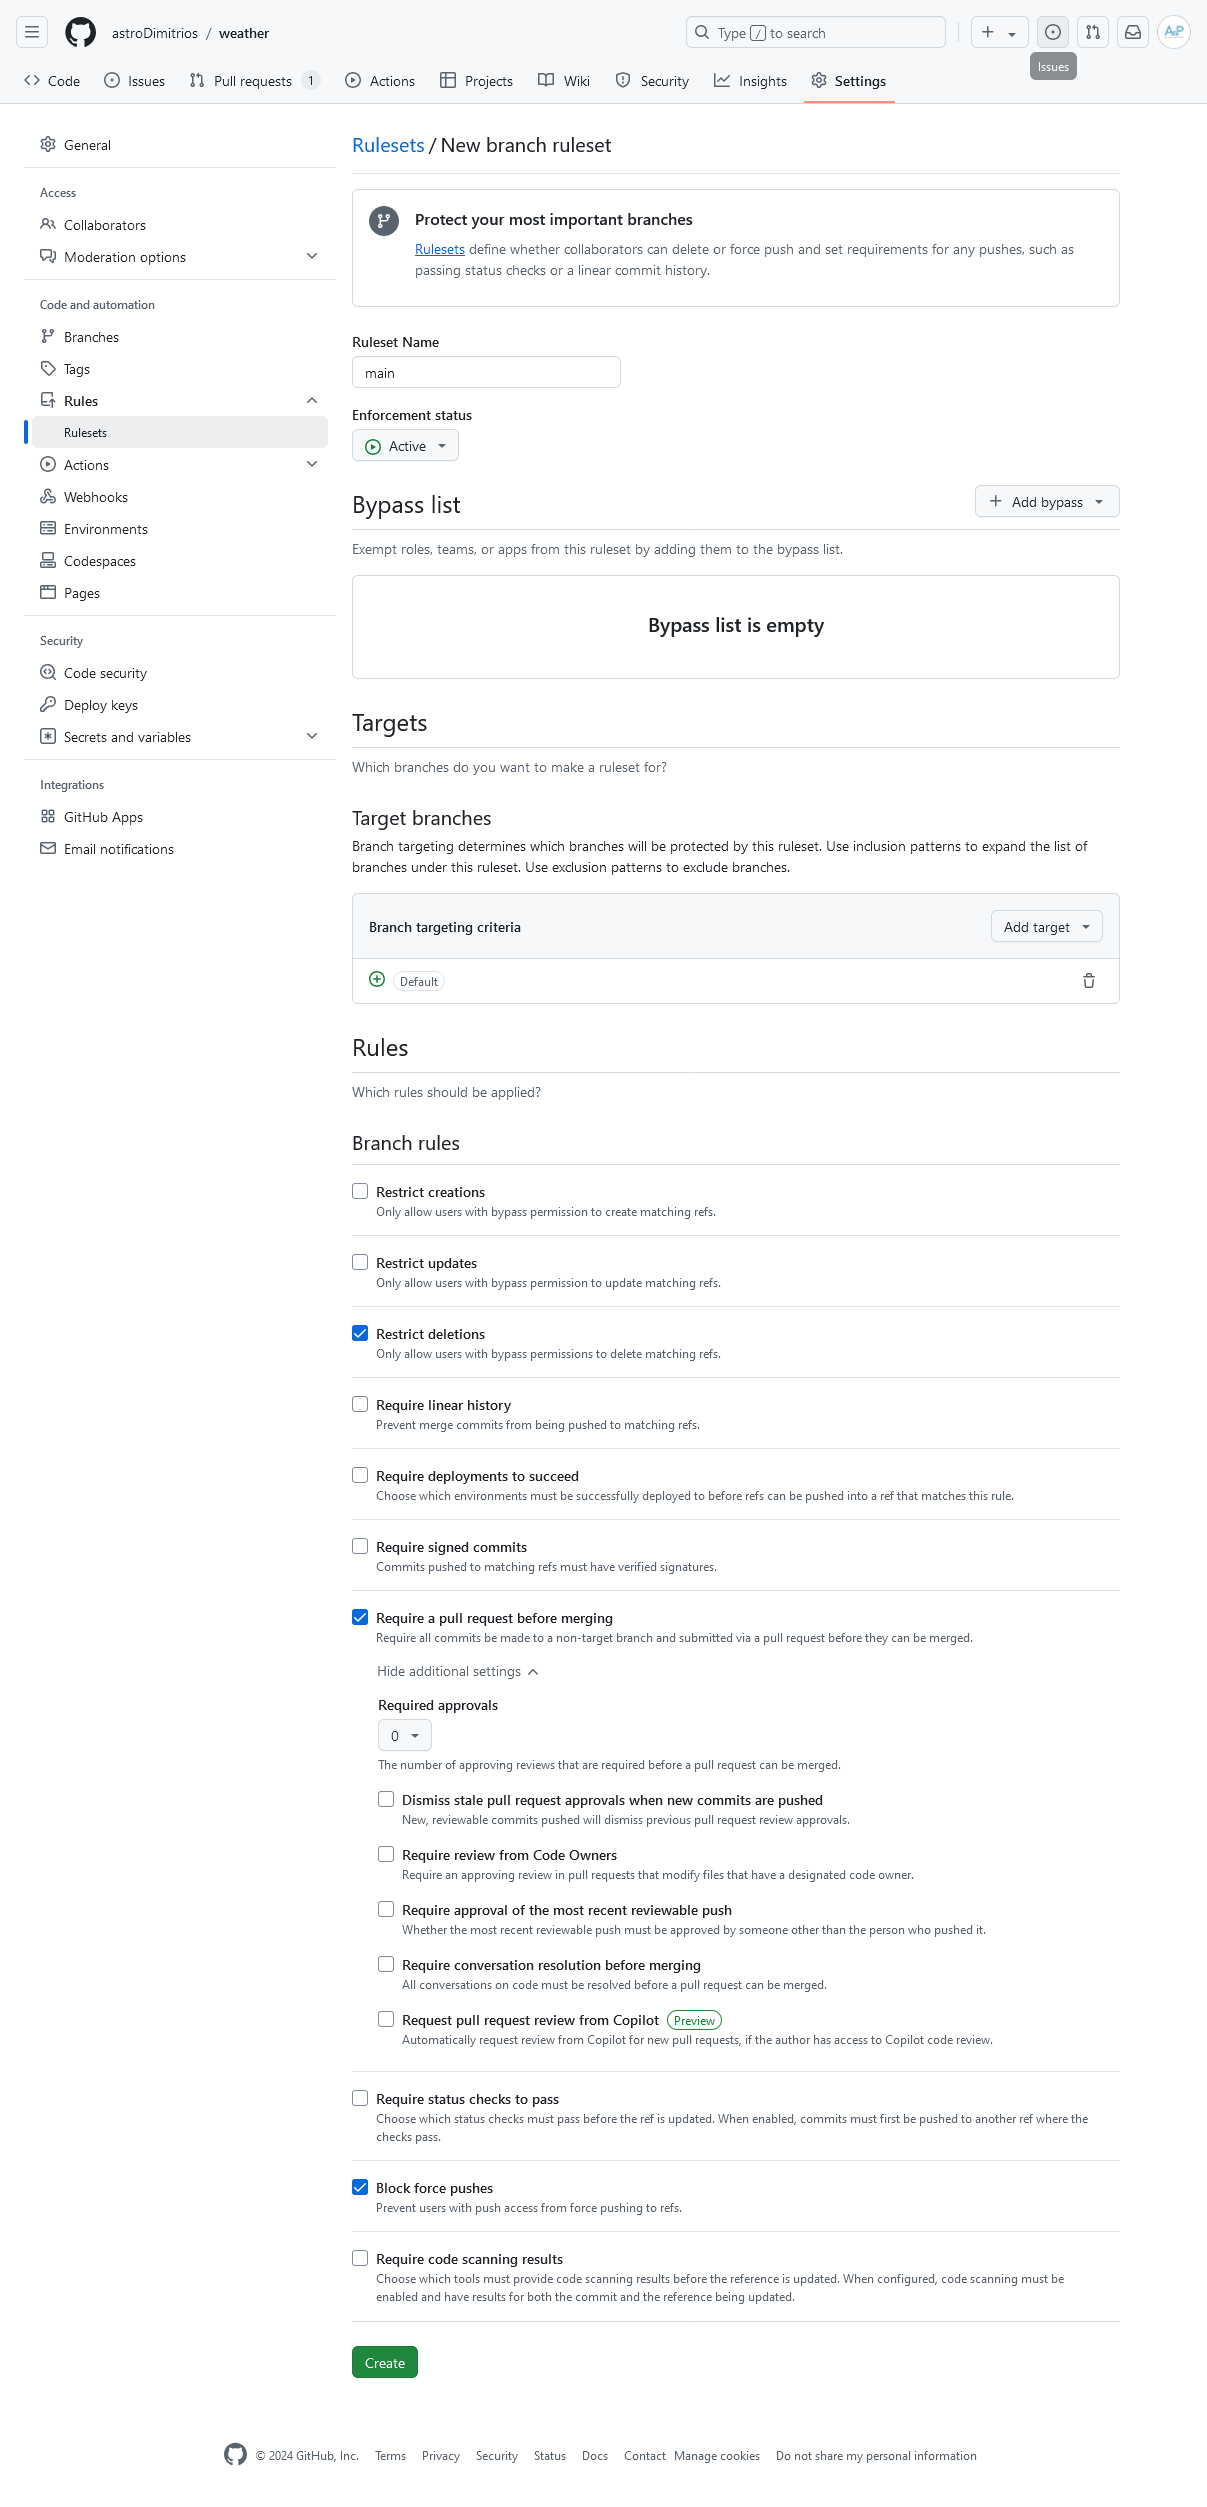
Rulesets
GitHub Rulesets control how people can interact with your repository.
When we opened our first PR we were prompted to Require approval from specific reviewers before merging. Click on the Add rule button.
This page lets us create a rule preventing anyone from committing
directly into the main branch. All repositories should have
some form of protection using these rulesets. To add a rule to protect
the main branch:
- Enter the Ruleset Name
main - Change the Enforcement status to
Active - Scroll down to Target branches. Click Add
target and select Default branch (which in our
weatherrepo ismain). - Scroll down to Rules. Tick the Require a pull request before merging option.
- At the bottom of the page click the green Create button.
Now even if you commit to main locally you will not be
able to push those changes to GitHub. To add changes you
MUST open a PR and go through code and science
review.
Private Personal Repos
Rulesets cannot be created on private repos in your personal space unless you have a paid GitHub plan.
Merging a Pull Request
Navigate back to your PR. To merge the PR click on the dropdown, and
select Squash and merge. Squashing before merging will
combine all the commits on your branch and ‘squash’ them into a single
new commit on the target branch, in this case main. This
helps keep the commit history of the main branch tidy and
linear1.
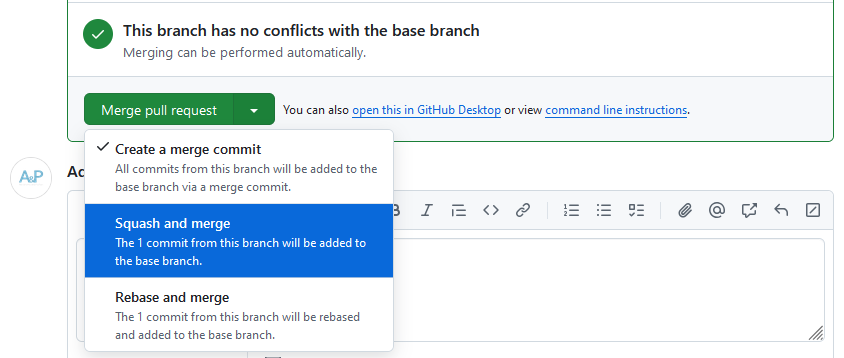
Once you’ve selected the squash option click on the green Squash and merge button. Edit the commit title so that the PR number is at the start of the message. For instance:
OUTPUT
Add in a forecast file (#1)Would be changed to:
OUTPUT
#1 Add in a forecast fileThis makes it easier to navigate to the PR for a change when you’re on the GitHub repositories code view. Change the description if necessary. Then click on Confirm squash and merge.
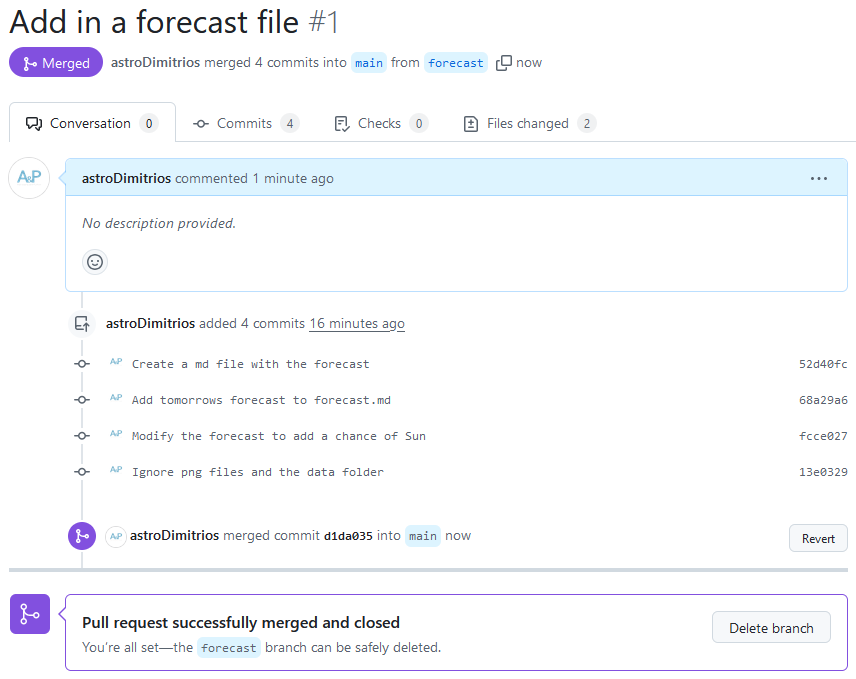
The PR is now successfully merged into the main branch.
We can safely delete the forecast branch from the GitHub
repo. Click on the Delete branch button.
Updating your Local Repo
The new forecast.md file is currently only on the
main branch in GitHub. We should pull the changes down to
our local copy. Switch to the main branch:
Pull down the changes from GitHub:
BASH
remote: Enumerating objects: 4, done.
remote: Counting objects: 100% (4/4), done.
remote: Compressing objects: 100% (2/2), done.
remote: Total 3 (delta 1), reused 2 (delta 1), pack-reused 0 (from 0)
Unpacking objects: 100% (3/3), 1.01 KiB | 173.00 KiB/s, done.
From github.com:mo-eormerod/weather
   41c775b..49c845c  main       -> origin/main
Updating 41c775b..49c845c
Fast-forward
 .gitignore  | 2 ++
 forecast.md | 9 +++++++++
 2 files changed, 11 insertions(+)
 create mode 100644 .gitignore
 create mode 100644 forecast.md
git pull and GitHub’s Pull Requests are not the same.
GitHub Pull Requests are where we performed code and science review,
then merged our feature branch changes into the main
branch. git pull is fetching changes to the remote branch
on GitHub and merging them into your local copy.
You may need to tell Git what to do
If you see the below in your output, Git is asking what it should do.
OUTPUT
hint: You have divergent branches and need to specify how to reconcile them.
hint: You can do so by running one of the following commands sometime before
hint: your next pull:
hint:
hint:   git config pull.rebase false  # merge (the default strategy)
hint:   git config pull.rebase true   # rebase
hint:   git config pull.ff only       # fast-forward only
hint:
hint: You can replace "git config" with "git config --global" to set a default
hint: preference for all repositories. You can also pass --rebase, --no-rebase,
hint: or --ff-only on the command line to override the configured default per
hint: invocation.
In newer versions of Git it gives you the option of specifying
different behaviours when a pull would merge divergent branches. The Git
& GitHub Working Practices training will help you decide which
option is best for your teams repositories. For now we will use the fast-forward only
strategy. To use this strategy run the following command to select
it as the default thing Git should do.
Then attempt the pull again.
How do I know there are Changes to Pull?
git pull actually runs two commands:
The git fetch command fetches any changes on the GitHub
remote. Then git merge merges those changes into your local
branch.
If you’re not sure if there are changes to pull; or you’re not sure
you want to merge the changes right away run git fetch and
examine the output before running git pull.
Example git fetch output showing changes on the remote
main branch being fetched:
OUTPUT
remote: Enumerating objects: 4, done.
remote: Counting objects: 100% (4/4), done.
remote: Compressing objects: 100% (2/2), done.
remote: Total 3 (delta 1), reused 2 (delta 1), pack-reused 0 (from 0)
Unpacking objects: 100% (3/3), 1010 bytes | 144.00 KiB/s, done.
From github.com:mo-ormerod/weather
   49c845c..e4bdab8  main       -> origin/main
Cleaning up your Local Branches
We deleted our forecast dev branch from GitHub but we
still have a local copy. Let’s tidy up by deleting it. To see all our
branches including remote GitHub branches run:
OUTPUT
  forecast                13e0329 [origin/forecast] Ignore png files and the data folder
* main                    d1da035 [origin/main] #1 Add in a forecast file
  remotes/origin/forecast 13e0329 Ignore png files and the data folder
  remotes/origin/main     d1da035 #1 Add in a forecast file
The first two branches are our local branches, the last two are the GitHub remotes. To remove references to remote branches that have been deleted on GitHub run:
Pruning origin
URL: git@github.com:mo-eormerod/weather.git
 * [pruned] origin/forecast
Running git branch -avv again now shows:
  forecast            13e0329 [origin/forecast: gone] Ignore png files and the data folder
* main                d1da035 [origin/main] #1 Add in a forecast file
  remotes/origin/main d1da035 #1 Add in a forecast file
You can see the remote reference for the forecast branch
has been removed. The second line with the local forecast
branch now has gone in the brackets referencing the remote
branch.
To delete our local branch run:
Running git branch -avv again now shows:
OUTPUT
* main                d1da035 [origin/main] #1 Add in a forecast file
  remotes/origin/main d1da035 #1 Add in a forecast file
You’ve now successfully merged and tidied up after your first pull
request. Remember when making changes create a new branch and open a PR,
NEVER commit to the main branch.
Adding in a seasonal-forecast.md file
Try adding in a seasonal forecast using the following steps:
- Create a new branch with an appropriate name and switch to it
- Create the
seasonal-forecast.mdfile - Add and commit the new file
- Push the changes to GitHub
- Open a PR on GitHub
- Merge the PR, delete the branch on GitHub
- Pull down the changes to your local copy
- Tidy up your branches
- Create a new branch with an appropriate name and switch to it
OUTPUT
Switched to a new branch 'add-seasonal-forecast'- Create the
seasonal-forecast.mdfile
OUTPUT
# Seasonal Forecast

- Winter is wet
- Summer is hot- Add and commit the new file
OUTPUT
[add-seasonal-forecast aeaf804] Add in a seasonal-forecast.md file
 1 file changed, 4 insertions(+)
create mode 100644 seasonal-forecast.md- Push the changes to GitHub
OUTPUT
Enumerating objects: 4, done.
Counting objects: 100% (4/4), done.
Delta compression using up to 4 threads
Compressing objects: 100% (3/3), done.
Writing objects: 100% (3/3), 326 bytes | 163.00 KiB/s, done.
Total 3 (delta 1), reused 0 (delta 0), pack-reused 0
remote: Resolving deltas: 100% (1/1), completed with 1 local object.
remote:
remote: Create a pull request for 'add-seasonal-forecast' on GitHub by visiting:
remote:      https://github.com/mo-ormerod/weather/pull/new/add-seasonal-forecast
remote:
To github.com:mo-ormerod/weather.git
 * [new branch]      add-seasonal-forecast -> add-seasonal-forecast
branch 'add-seasonal-forecast' set up to track 'origin/add-seasonal-forecast'.- Open a PR as shown in this very episode!
- Merge the PR, delete the branch on GitHub
- Pull down the changes to your local copy
Switch to main:
If you want to check if there are changes to pull:
OUTPUT
remote: Enumerating objects: 4, done.
remote: Counting objects: 100% (4/4), done.
remote: Compressing objects: 100% (2/2), done.
remote: Total 3 (delta 1), reused 2 (delta 1), pack-reused 0 (from 0)
Unpacking objects: 100% (3/3), 1010 bytes | 144.00 KiB/s, done.
From github.com:mo-ormerod/weather
   49c845c..e4bdab8  main       -> origin/main
Then merge the changes:
OUTPUT
Updating 49c845c..e4bdab8
Fast-forward
 seasonal-forecast.md | 4 +++
 1 file changed, 4 insertions(+)
create mode 100644 seasonal-forecast.md- Tidy up your branches
OUTPUT
Pruning origin
URL: git@github.com:mo-ormerod/weather.git
* [pruned] origin/add-seasonal-forecastOUTPUT
Deleted branch add-seasonal-forecast (was aeaf804).- A pull request (PR) is where your changes go through code and science review.
- PRs can contain automated checks to help speed up the review process and avoid human error.
- The PR will automatically create an easy to read diff (difference) of the changes for the review (in the Files changed tab).
- Squashing and merging takes all the commits in your PR and ‘squashes’ them into a single new commit on the target branch.
-
git fetchfetches changes to the GitHub remote. -
git pullpulls and merges changes to the GitHub remote into your local copy. -
git branch -avvdisplays all your local branches including references to any remote branches. -
git remote prune originremoves references to remote branches that have been deleted on GitHub.